REST API is one of the most popular API standard. This article assumes that you already know what REST standard is. If you don’t, please go though this Wikipedia link.
As an example, we would create a service that will provide information of TV series, seasons and episodes.
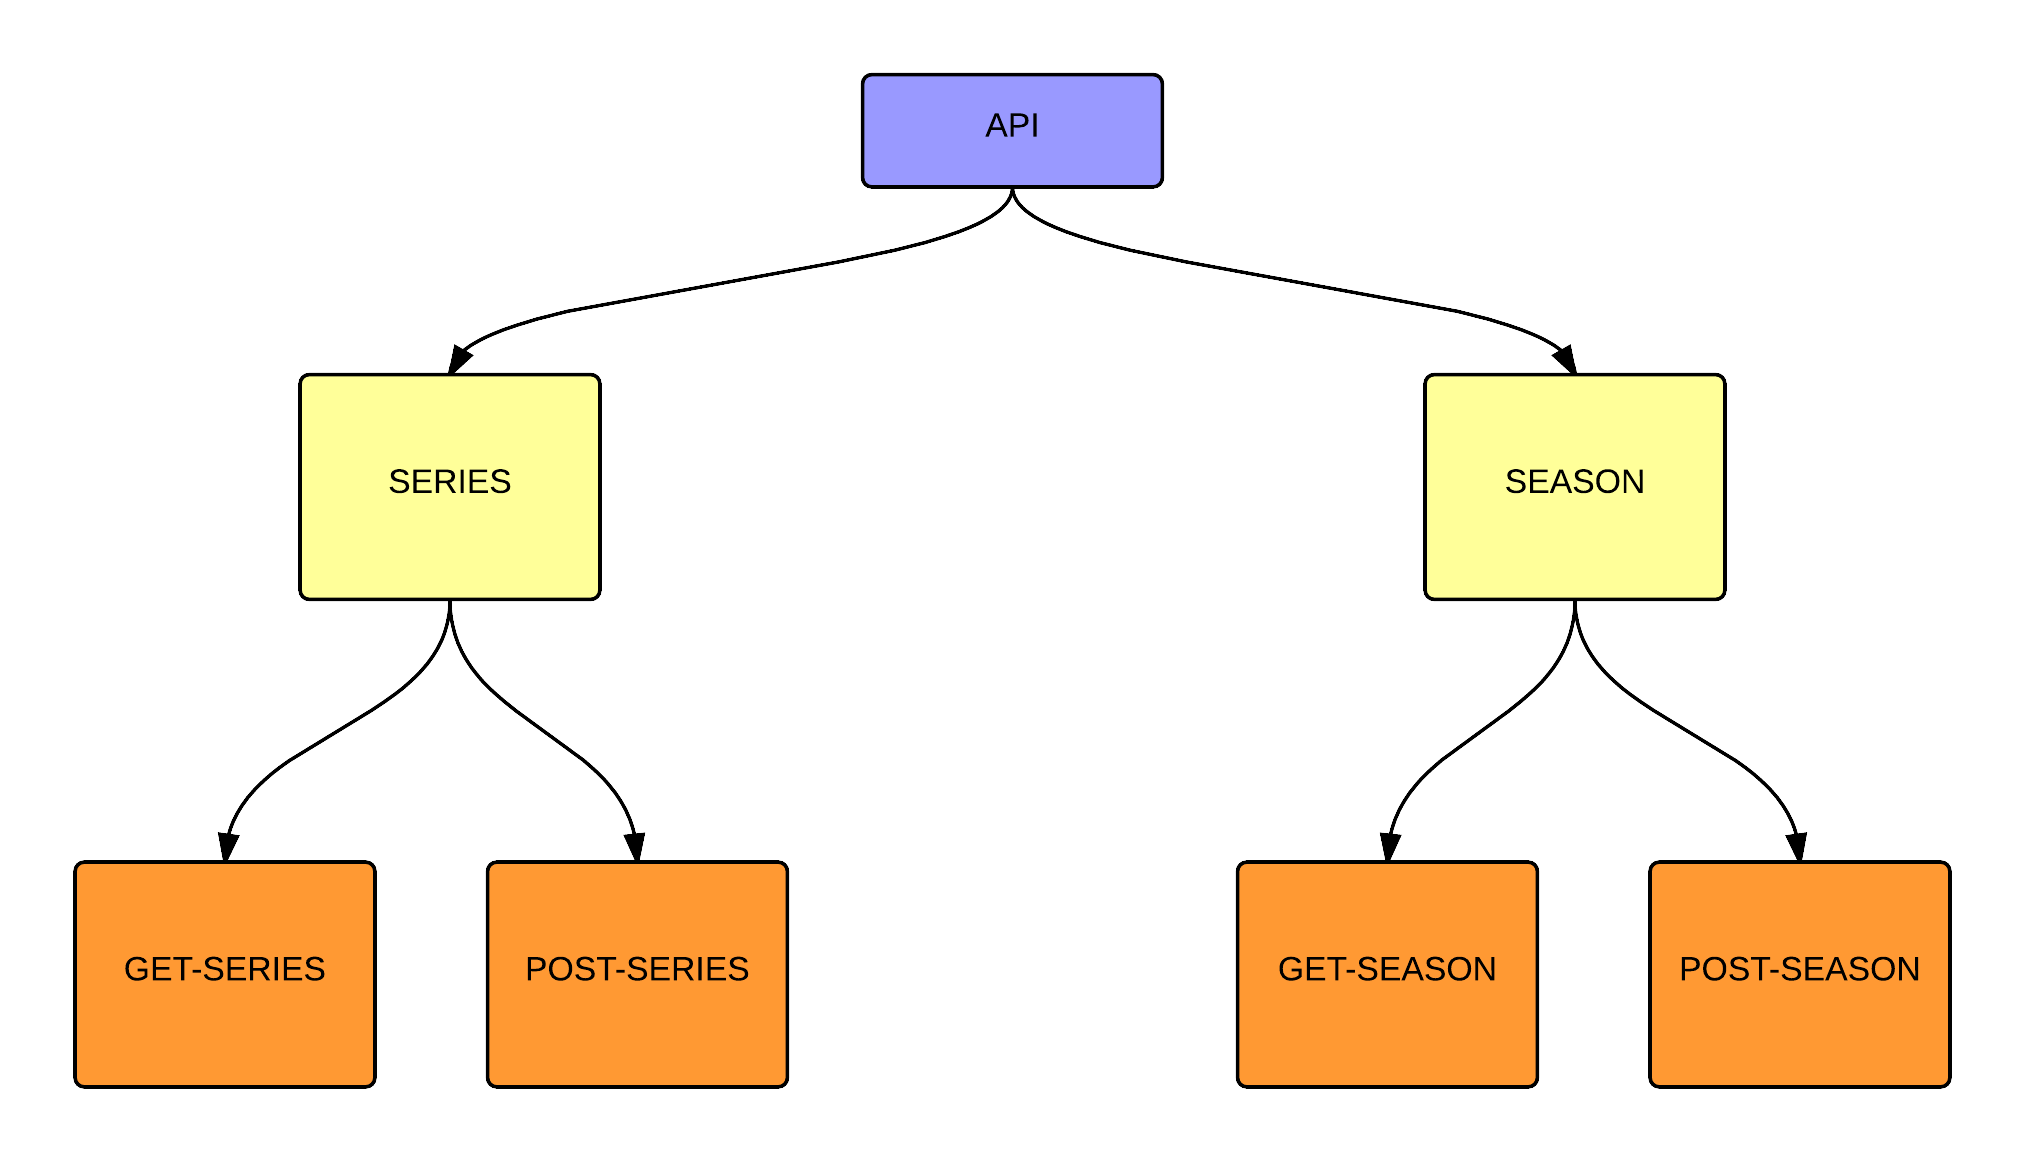
Following API will be implemented:
- Series listing and detail
- Season listing and detail
- Episode listing and detail
Although it is possible to make the web-service using Yii itself, but, first, its always good to check if there is some extension available in Yii that provide this functionality. A search reveals that an extension is available link. We would use this extension instead of making one from scratch.
A good tutorial to make a REST API from scratch can be found here.
Detailed documenation of RestfullYii extension is available here.
1. Installation
The first step will be to install it. We already have composer setup, so we will use composer to install it. (If you don’t know how to use composer with Yii-1.x, please read this blog)
Go in project root directory and run the following command
php composer.phar require starship/restfullyii:dev-master
2. Configuration
Then we would edit the protected/main.php, as follows. In main array add the following code
'aliases' => array(
 'RestfullYii' => realpath(__DIR__ . '/../vendor/starship/restfullyii/starship/RestfullYii'),
 'vendor' => 'application.vendor',
 ),

Add a urlManager component in the components array

'urlManager'=>array(
 'urlFormat'=>'path',
 'rules'=>require(
 dirname(__FILE__).'/../vendor/starship/restfullyii/starship/RestfullYii/routes.php'
 ),
 ),
3. Gii Module
We would also enable the Gii module and set its password to something small. Our Gii module configuration would look like
'gii' => array(
 'class' => 'system.gii.GiiModule',
 'password' => 'gii',
 // If removed, Gii defaults to localhost only. Edit carefully to taste.
 'ipFilters' => array('127.0.0.1', '::1'),
 ),
4. Database Schema
Now we will create the database tables. We will be using MySQL. Setting up MySQL and configuring it with Yii is out of scope of this blog. For more details you can read here. I would assume that your protected/database.php has the following component
return array(
 'connectionString' => 'mysql:host=localhost;dbname=televod',
 'emulatePrepare' => true,
 'username' => 'televod',
 'password' => 'televod',
 'charset' => 'utf8',
 );
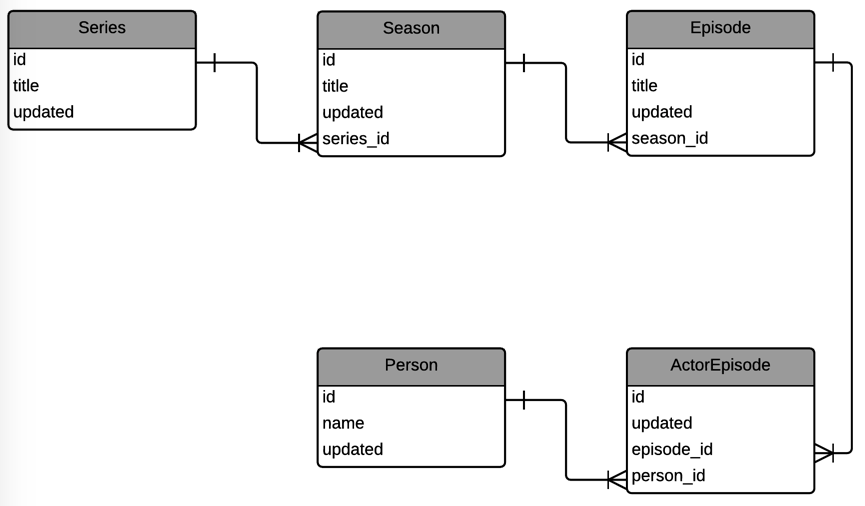
The DB schema will be as follows
5. Database Migrations
Now we create a migration script to create the DB tables. To create a migration script, run the following command
./app/protected/yiic migrate create create_app_tables
This would create a migration script in protected/migrations directory. We will remove the Up() and Down() functions and add the code to create tables in safeUp() and safeDown() functions.
public function safeUp()
 {
 $this->createTable('{{series}}', array(
 'id' => 'pk',
 'title' => 'varchar(64) NULL',
 'updated' => 'datetime NOT NULL',
 ), 'ENGINE=InnoDB'
 );

$this->createTable('{{season}}', array(
 'id' => 'pk',
 'title' => 'varchar(64) NULL',
 'updated' => 'datetime NOT NULL',
 'series_id' => 'int(10) NOT NULL',
 'KEY `season_id` (`series_id`)',
 'CONSTRAINT `Series` FOREIGN KEY (`series_id`) REFERENCES `{{series}}` (`id`) ON DELETE CASCADE ON UPDATE NO ACTION'
 ), 'ENGINE=InnoDB'
 );

$this->createTable('{{episode}}', array(
 'id' => 'pk',
 'title' => 'varchar(64) NULL',
 'updated' => 'datetime NOT NULL',
 'season_id' => 'int(10) NOT NULL',
 'KEY `season_id` (`season_id`)',
 'CONSTRAINT `Season` FOREIGN KEY (`season_id`) REFERENCES `{{season}}` (`id`) ON DELETE CASCADE ON UPDATE NO ACTION'
 ), 'ENGINE=InnoDB'
 );

$this->createTable('{{person}}', array(
 'id' => 'pk',
 'name' => 'varchar(128) NOT NULL',
 'updated' => 'datetime NOT NULL',
 ), 'ENGINE=InnoDB'
 );

$this->createTable('{{actor_episode}}', array(
 'id' => 'pk',
 'updated' => 'datetime NOT NULL',
 'person_id' => 'INT(10) NOT NULL',
 'episode_id' => 'int(10) NOT NULL',
 ), 'ENGINE=InnoDB'
 );
 }

public function safeDown()
 {
 $this->dropTable('{{episode}}');
 $this->dropTable('{{season}}');
 $this->dropTable('{{series}}');

$this->dropTable('{{actor_episode}}');
 $this->dropTable('{{person}}');
 }
Now Run the Yii migrate command
./app/protected/yiic migrate up
You should now have the tables created in the DB.
6. Models and Controllers
We have already enabled the Gii modules. We will generate the models using it, as described here
Once we have created the models we can write a controller, as described in RestfullYii documentation
The complete SeriesController will be as follows. SeasonController and EpisodeController can be added, in the same way.
class SeriesController extends CController
 {

public function filters()
 {
 return array(
 'accessControl', // perform access control for CRUD operations
 array(
 'RestfullYii.filters.ERestFilter +
 REST.GET, REST.PUT, REST.POST, REST.DELETE, REST.OPTIONS'
 ),
 );
 }

public function actions()
 {
 return array(
 'REST.' => 'RestfullYii.actions.ERestActionProvider',
 );
 }

public function accessRules()
 {
 return array(
 array('allow', 'actions' => array('REST.GET', 'REST.PUT', 'REST.POST', 'REST.DELETE', 'REST.OPTIONS'),
 'users' => array('*'),
 ),
 array('deny',
 'users' => array('*'),
 ),
 );
 }
 }
 9- Lastly, we will set the "params" array in protected/main.php to have a global handler for all authentication

'RestfullYii' => array(
 'post.filter.req.auth.ajax.user' => function(){
 return true;
 }
 )
Now our API is setup and we can use a REST Client (for Chrome) to make API calls.
For example to get the list of series, we can put the use the following URL
http://192.168.1.77/api/series
7. Summary
Please always remember to:
- Use of extensions to reuse functionality
- Use of Composer to manage packages
- Use of DB migrations to create DB Schema
- Use of REST client to test APIs